How to run the perfect Shopify flash sale
Got a product that everyone wants?
Our step-by-step guide will help you to plan a no-stress Shopify product drop in advance. You'll have all the tools you need to manage traffic peaks, eliminate overselling, and keep the bots away.
Get ready to run the perfect Shopify flash sale.
Online waiting room for flash sales
When you are expecting a lot of traffic, you need to ensure that your site will not be overwhelmed, and the best way to do this is by offloading excess traffic to an online waiting room.
Not only will a waiting room and queuing system manage your traffic gracefully, it will also allow you to customise the user experience – and demonstrate fairness to your customers – without impacting site performance.
Of course, Shopify has a queuing system. After all, it's the de facto e-commerce platform, used by some of the biggest names around the world, and it has a great reputation for scalability and traffic management. That's why you're using it, right?
But did you know that Shopify's queuing system only kicks in on the checkout page?
This can mean that delighted customers who have added items to their cart can be disappointed to reach checkout and find that, actually, the product has sold out.
A more robust solution, which eliminates the possibility of overselling, is to use an online waiting room specialist with full Shopify integration, such as CrowdHandler.
During your flash sale, CrowdHandler will eliminate overselling and communicate real-time information to your users. It can detect bot traffic and suspicious behaviour, both in the queue and on your site, ensuring fairness for your customers (and a stress-free sale for you).
One week before
1. Install and set up waiting rooms
With CrowdHandler, you can schedule online waiting rooms in advance, to give you a bit of breathing space and testing time. So step one - a week before your Shopify flash sale goes live - is to create a CrowdHandler account. The free trial will be fine to test your setup, but you will need at least the CrowdHandler standard package for a real life drop.
2. Install CrowdHandler's Shopify Integration
First, add CrowdHandler's Shopify JavaScript. This is the key integration component and drives validation of end users to check whether they should be allowed on to your Shopify PDP or redirected to the waiting room.
Next, add the anti-cheat code to prevent script kiddies. This code detects and removes line items from a Shopify session that have not been validated and flagged as promoted by CrowdHandler - in other words, if someone manages to get the product into their cart without going through the waiting room, we'll whip it right back out again.
The third part of the installation is to set up stock syncing. This tells CrowdHandler which product it is protecting and synchronises the inventory quantities, allowing real time stock levels to be displayed in the CrowdHandler waiting room. This can also be used to trigger your waiting room state (for example: "sold out").
If you need it, you can also add checkout busting. Destroying a customer's session as soon as they have seen their order confirmation allows more users through and keeps the queue moving faster.
3. Design a custom template
We know that branding is crucial to Shopify sellers, which is why CrowdHandler allows you to create a custom, on-brand template. Your template can include all of your usual brand colours, fonts and styles, not to mention language and tone.
All the messaging is already set up in the template, but you will want to make it your own, so have fun changing it to match your unique style. Take special care over the stock tracking and sellout messaging – for example, the default stock type is "items", so if you're selling sneakers you'll want your Shopify customers to see that there are only 11 pairs left.
(No time for all that? If you're in a super emergency, just upload your logo. That's the speediest way to get your waiting room on brand if you need it to go live asap.)
One day before
4. Configure your domain
Here is where you need to think about the rate of traffic – in other words, how quickly you want to sell out.
Because the aim of the game here is not to sell out as fast as possible; it's to show that the process is fair. Although a limited-edition product range could be snapped up as soon as the sale goes live, you want people to feel as if they were part of it. You don't want them to believe that bots snatched everything in a split second.
(By the way, if you are worried about bots, you may also want to turn on reCAPTCHA - the "I am not a robot" checkbox.)
So, as a rule of thumb, if you're selling 1000 items and you want to sell out in five minutes, you want a rate of about 200 (because 1000/5=200).
Then, check the One In One Out and Track Stock Availability options, set Session Timeout to 5 minutes, and check Allow Sessions to Expire in Waiting Room.
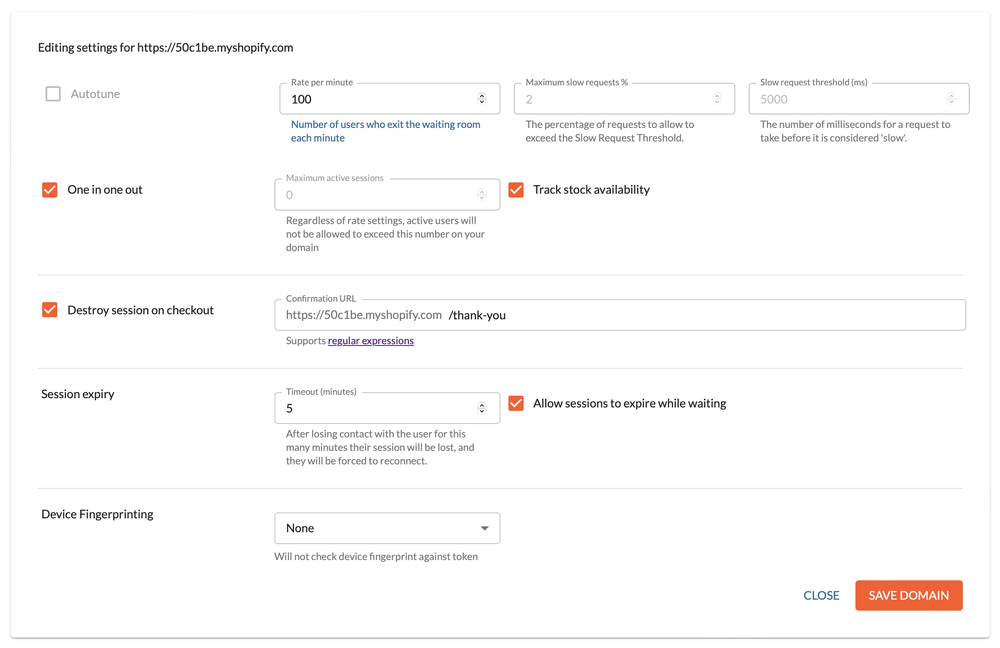
An example of a Shopify flash sale setup on CrowdHandler
This way, the process is automated based on how much stock you have left, and you will never let more people onto your product pages than you have product to sell.
5. Configure your waiting room
Here’s where you design the “flash sale experience” for your customers. You can find more detailed instructions about adding or editing a waiting room here, but to summarize:
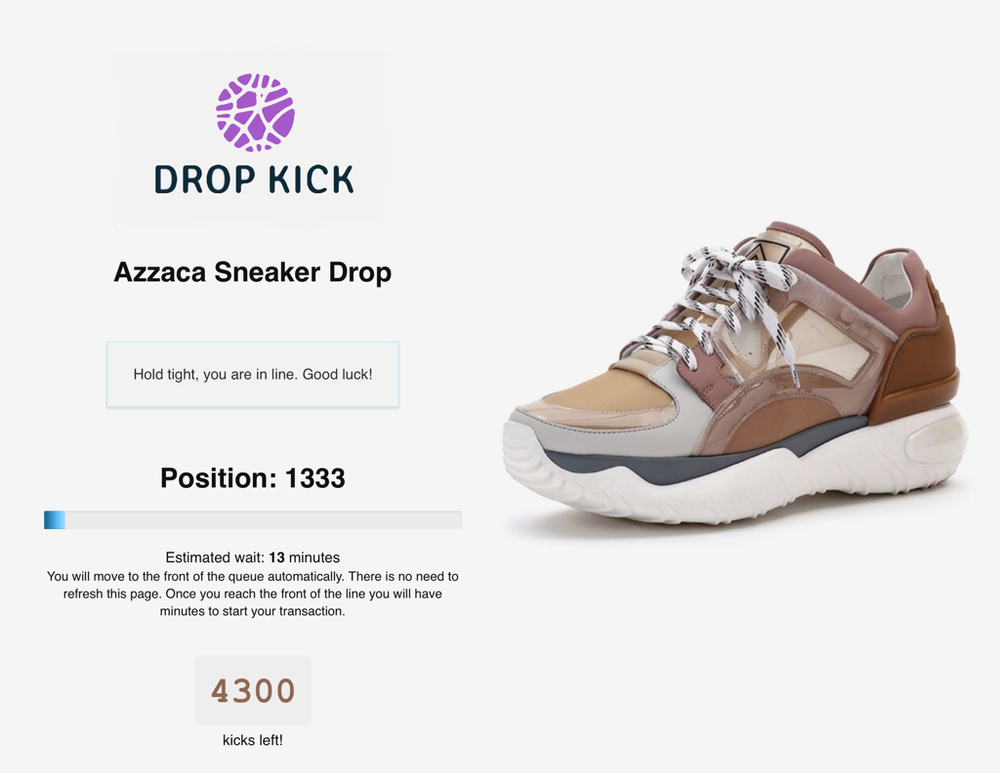
Give the room a title that matches the type of sale you’re running. After all, this room is dedicated to this sale, and waiting in here will be a big part of the customer experience. So, don’t just call it “waiting room”. Get your customers hyped!
Set the URL trigger to match your product detail page. (for example, /products/your-sale-product).
Schedule Queue Activates to be the time your flash sale goes live.
Set a countdown 15 to 60 minutes before the drop time – the more dedicated the audience, the longer the countdown will need to be. That way, CrowdHandler can start gathering any curious users in advance of the sale going live.
Make sure you’ve set up your product and variant IDs to stock sync. (Don’t allocate product availability in Shopify yet – you will do this on the day, once the countdown starts.)
Finally, use the message field to tell your users what’s going on. Waiting Room instructions are built into the template, so you don’t need to tell people “you are in a waiting room” – they will know this! Instead, use the message box to communicate specifically about your drop. Tell them they’re in the right place and get them excited about what they are about to buy.
On the day
6. Get ready for the big drop!
Are you ready? Is the waiting room open and counting everyone down to your big Shopify flash sale opening?
Now is the time to allocate your product availability on Shopify. Once the countdown is happening, no one's getting access to your product, so there’s no chance of an accidental purchase.
This is also the time that you can get excited. During countdown, keep an eye on the CrowdHandler graphs to watch the buildup and see just how many people are getting hyped for your flash sale.
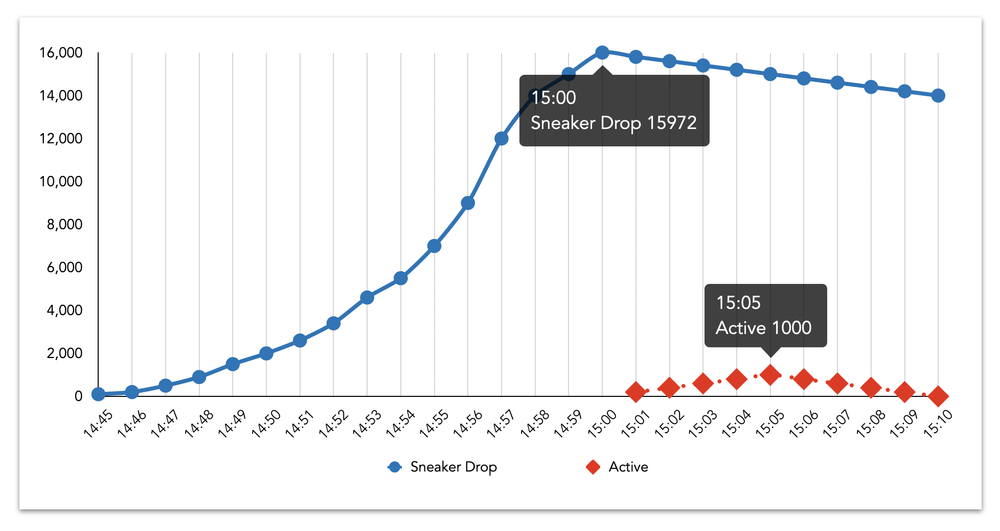
Watching the buildup during the countdown to a Shopify flash sale
If you've underestimated the demand and you want to increase your waiting room capacity, you can always upgrade at this point.
Then, the doors will open and you can watch the orders come flooding in!
7. All done
Once the stock levels reach zero (or demand dies out), it’s time to close the sale.
If you have sold out, you don’t need to worry about closing the sale manually – as long as you’re using One In One Out and Track Stock Availability, CrowdHandler will stop putting people through as soon as the stock level reaches zero. And, as soon as Shopify syncs the zero stock level, it will change the page to a sold-out page.
Now the deactivate the waiting room by editing the waiting room and changing the URL trigger to ‘disabled’.
Get started today
Expecting a large increase in checkouts? If you're looking to run a smooth flash sale on a Shopify site, CrowdHandler's dedicated Shopify integration is the perfect partner.
Read more:
We’re excited to see the experiences people build.
Not using CrowdHandler yet? Sign up today and let us handle the traffic while you handle the sales.
Sign up